MailWizz Tutorial Series
Master MailWizz step by step, from first-time setup to advanced multi-tenant scaling, with this 3-part tutorial series.
- MailWizz tutorial for beginners (this current tutorial): Start from a fresh MailWizz install, connect delivery and bounce servers, create lists and templates, and send your first tracked campaign safely.
- MailWizz tutorial for intermediate users: Improve deliverability, design warmup plans, clean and segment lists, test templates, and scale sending more safely.
- MailWizz advanced tutorial: Go deeper with backend mastery, multi-tenant architecture, blacklist automation, API workflows, advanced funnels, and incident-ready operations.
Before you follow this MailWizz tutorial
- ✅ Goal of this guide: Go from a fresh MailWizz install to sending your first tracked campaign safely.
- What you’ll set up: Backend profile, delivery servers, bounce servers, warmup plans, lists, templates, and campaigns.
- What you manage yourself: Your server (VPS/shared), DNS records, and SMTP or delivery provider.
- Safe sending approach: Warm up new IPs/domains, send in small batches first, and watch stats before scaling.
- List quality reminder: Use only permission‑based, cleaned lists and upload existing blacklists before any send.
- What you’ll learn to read: Opens, clicks, bounces, and basic analytics so you can optimize future campaigns.
If you are looking for a practical MailWizz tutorial for beginners, you are probably ready to move from a SaaS email platform to a self‑hosted solution you fully control.
In this MailWizz tutorial, you will go from a fresh MailWizz install to sending your first campaign, covering both the backend configuration and the customer interface step by step.
By following this MailWizz step by step guide, you will learn which tools you need, how to connect your SMTP and bounce servers, how to create and upload your lists, how to build templates, and how to launch a test campaign safely.
The process is designed for marketers, founders, and technical users with basic hosting knowledge, and you can complete it in about 30 – 60 minutes if you already have your server and SMTP ready.
MailWizz prerequisites before you start
Before you follow this MailWizz tutorial for beginners, make sure you have a few essentials ready.
- A domain name you control, with access to DNS (to create records for your MailWizz app and your sending domains).
- A server to host MailWizz: VPS or shared hosting with PHP, MySQL, and enough resources for your expected list size and volume.
- An SMTP or delivery provider (own SMTP server or third‑party SMTP such as a transactional ESP) that you can connect as a delivery server.
- Basic DNS readiness: ability to create SPF, DKIM, and custom subdomains (for example app.yourdomain.com for MailWizz, plus tracking/sending domains if needed).
- A clean email list you are allowed to email, ideally already cleaned from obvious bounces and spam traps.

Mailwizz is a self-hosted email marketing software that helps businesses and entrepreneurs to create, manage, design, and send their email marketing campaigns. Mailwizz allows users to create a personalized email template with all the information they need.
If you would rather write the markup yourself before importing it, build it in our HTML email template generator and paste the exported code into Mailwizz.
It also provides a drag-and-drop editor for easy content management and a powerful segmentation tool for highly targeted marketing. It’s the perfect tool for anyone who wants to optimize their email campaigns or grow their business, without the risk of getting banned, like what happens sometimes with SAAS Email Marketing Platforms, and without spending a load of dollars for a certain number of contacts or campaigns. Moreover, if you have more than one business or many websites, this can be probably the perfect tool to handle all of this.
Self-hosted means that your email marketing solution, including the application interface and the servers, is set up inside a machine, this machine can be a Virtual Machine (VM), Virtual Dedicated Server (VDS), or mostly a Virtual Private Server commonly named, VPS. But it can be on a Docker as well.
If you are Mailwizz newbie, here is what you have to probably retain the most: Once Mailwizz installation is set up, the App has 3 main URLs, or interfaces:
- Backend Interface: where you will make your backend configuration
URL: https://app.yourwebsite.com/backend - Customer Interface: from where you will send your campaigns. And the is the main Mailwizz login
URL: https://app.yourwebsite.com/customer - Frontend Interface: You will probably not need it
URL: https://app.yourwebsite.com/frontend
MailWizz vs typical SaaS email platforms
| Aspect | MailWizz (self‑hosted) | SaaS email platforms |
|---|---|---|
| Pricing model | One‑time license for the software, you pay separately for your server and SMTP. | Recurring monthly fees based on contacts, sends, or features. |
| Control & ownership | Full control over infrastructure, data, and configuration on your own server. | Limited control; infrastructure and many technical settings are managed by the provider. |
| Risk of account bans | Much lower risk of sudden account shutdown as long as your hosting and SMTP provider are fine with your use case. | Higher risk of suspensions or bans if metrics, complaints, or content trigger provider policies. ⚠️ |
| Scalability | You can scale horizontally by upgrading your server or adding more SMTP/delivery servers. | Scaling is tied to higher plans, higher CPM, or enterprise contracts. |
| Deliverability control | Direct access to warmup plans, IPs, domains, and authentication; you can fine‑tune reputation strategy. | Deliverability is mostly a black box; you rely on the provider’s shared reputation and policies. |
| Technical complexity | Requires server management, DNS setup, and basic sysadmin skills (or a managed host). | Easier onboarding; hosting, updates, and much of the technical stack are handled for you. |
| Customization | Deep customization of sending limits, customer accounts, APIs, and workflow automations. | Customization limited to what the SaaS exposes in its UI and API. |
| Long‑term cost | Very cost‑effective at scale if you send large volumes or manage multiple projects. | Can become expensive at high volumes or when managing many brands/lists. |
Ready to get MailWizz and follow this tutorial?
Start with the official MailWizz license and unlock your self‑hosted email marketing stack.
- One‑time license, no per‑subscriber fees.
- Full control over your server, IPs, and sending limits.
- Perfect if you run multiple projects or want to scale cold and warm campaigns on your own infrastructure.
In this Mailwizz tutorial, we will see together the main features and functionalities of this superb tool, because, in the beginning, it may seem a bit difficult and “from where I have to start?” app, but it’s not the case actually. However, some of the features may require some advanced level in using Mailwizz.
Let’s start!
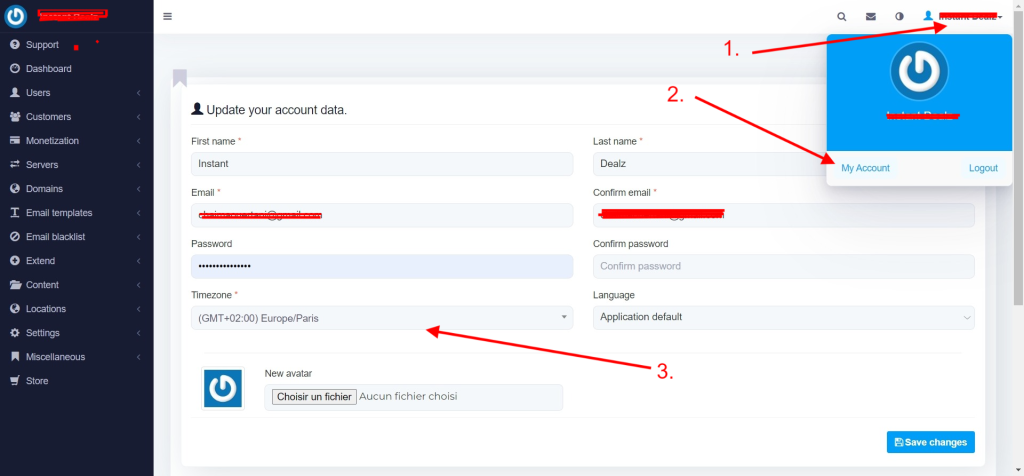
Complete your Profile and Update your Timezone
If you just set up your Mailwizz App, this is probably the first step that you have to do: Updating your profile.
Obviously, you should give a name to the App, which will be the default sender name afterwards, choose a language and probably an avatar. Once these steps are done, you will choose the right Timezone.
Updating your Timezone is crucial because you will need this to schedule your campaigns later according to your Timezone. Example: you cannot be in London and have an Australian Timezone.
So from your backend interface, go on the Top Right => Click on My Account => Adjust your Timezone
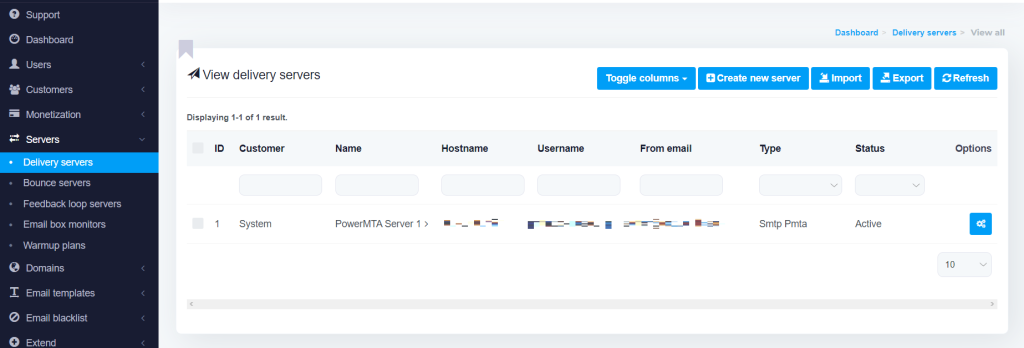
Set up your MailWizz delivery servers
Make sure that the Delivery server(s) is well set up and active, if it’s an embedded delivery server setup in the same VPS, it should have the same IP, according to each SMTP server setup.
The SMTP port should be always 25, 465, or 587 or related. Example: 2525, 4650, etc..
Configure your MailWizz bounce servers
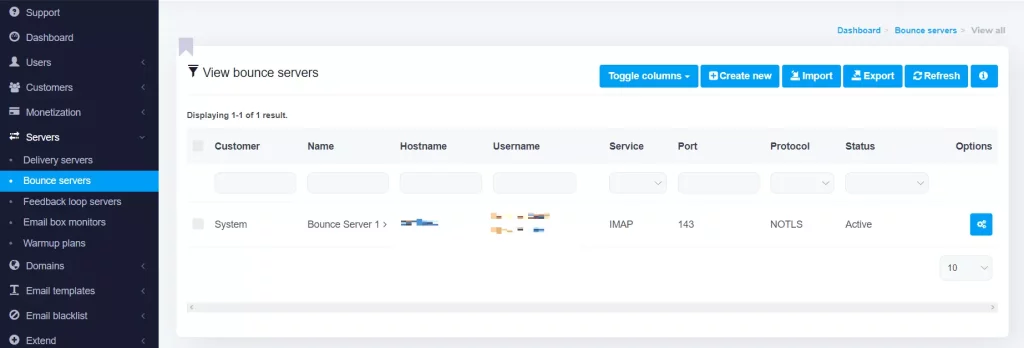
The Bounce Server(s) is where the bounce reports will land and this is where you make sure that you established a solid server structure.
The IMAP port should be either 143 for NOTLS or 993 for SSL/TLS
Upload your global email blacklist
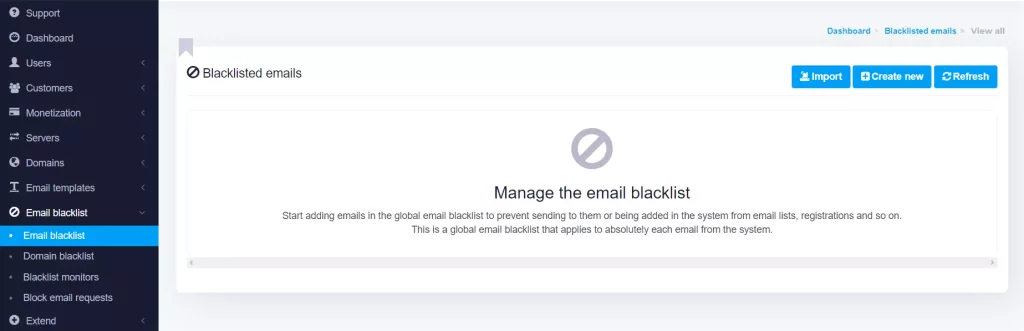
The email blacklist feature allows Mailwizz users to upload unsubscribed recipients, spam traps, invalid emails, email blocks, catch-alls, and all undesired emails.
In order to do this: Go to your Bakend => Click on Email Blacklist => Click on the Import button
The valid format for Mailwizz blacklist upload to Mailwizz Backend is:
- A CSV file
- The list headers should be: “,” comma separated and contain at least these 2 headers Email,Reason
Finally, you can do also all of the above through Mailwizz API. You can find through the Mailwizz documentation.
Create and manage MailWizz warmup plans
One of the most important Mailwizz tools is the warmup plan. A Warmup Plan can be implemented for multiple delivery servers, giving you the opportunity to benefit from its advantages in more than one place.
Upon finishing the plan for a delivery server, the restrictions imposed on its quota will be lifted.
To ensure timely delivery, the system will not move on to the next schedule until all scheduled deliverables have been sent out, irrespective of whether the quota is met or not.
As long as the sending is temporarily on hold, the program will automatically resume from the same point once resumed.
If you remove a Warmup Plan and the delivery server had it attached to it, you must make the necessary manual adjustments to the server quota afterward manually.
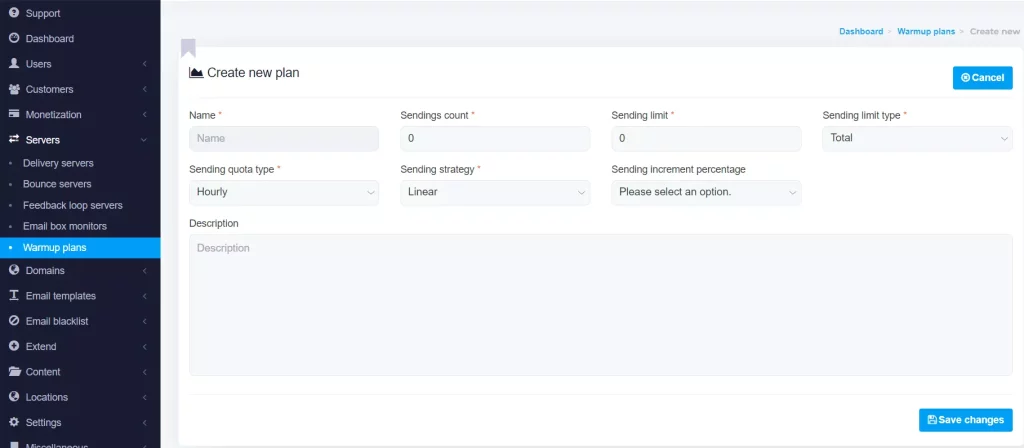
It’s not recommended to change plans while they are in the process of being generated. Instead, let the Warmup Plan complete its entire cycle before switching over. If you decide to switch anyway, the current plan will be temporarily frozen and can only be resumed if used with this same delivery server.
MailWizz deliverability basics for new senders
When you start sending from a new IP or a new domain, MailWizz gives you tools to protect your sender reputation rather than blasting your whole list at once.
- Start with low sending limits: combine your delivery server quota and warmup plan so you send in small daily batches and gradually increase volume instead of sending hundreds of thousands of emails on day one.
- Keep strict list hygiene: import only contacts who have opted in, remove obvious role accounts and known bad domains, and use the blacklist upload feature to block unsubscribes, spam traps, and problem addresses before any send.
- Use warmup plans to help inboxing: a warmup plan controls how many emails a delivery server can send over time, which helps mailbox providers trust your traffic and reduces the risk of bulk spam or blocking.
- Avoid changing warmup plans mid‑way: let a plan complete its cycle to keep a consistent sending pattern and avoid sudden jumps in volume that can hurt deliverability.
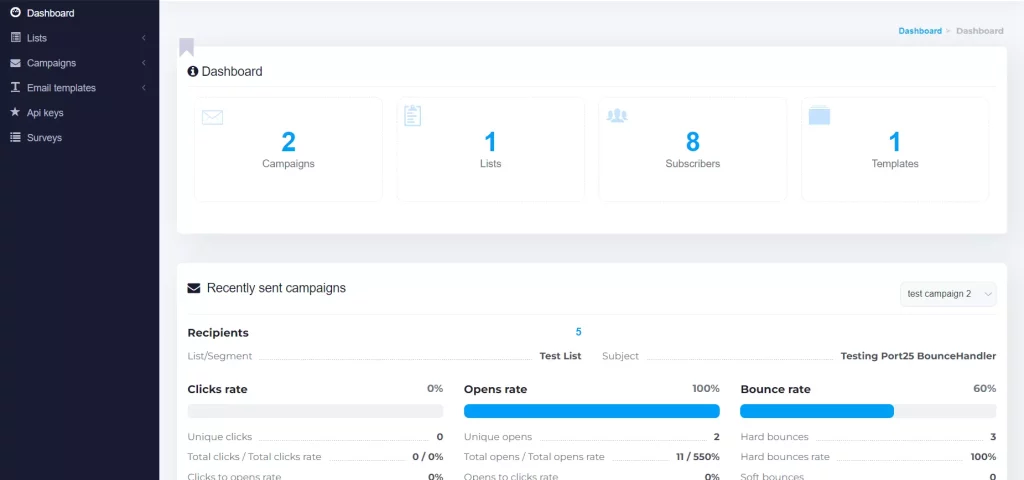
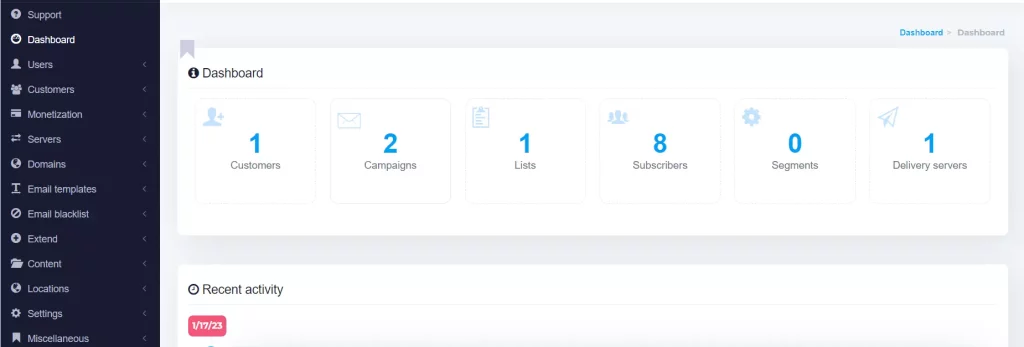
The frontend interface is your main dashboard, this is from where you will create and upload your lists, create your templates and newsletters, and send your email campaigns, which are actually the main Mailwizz frontend features.
Create Your First List
In order to create a list in Mailwizz, follow these steps:
- On your Customer interface Click on “Create New”
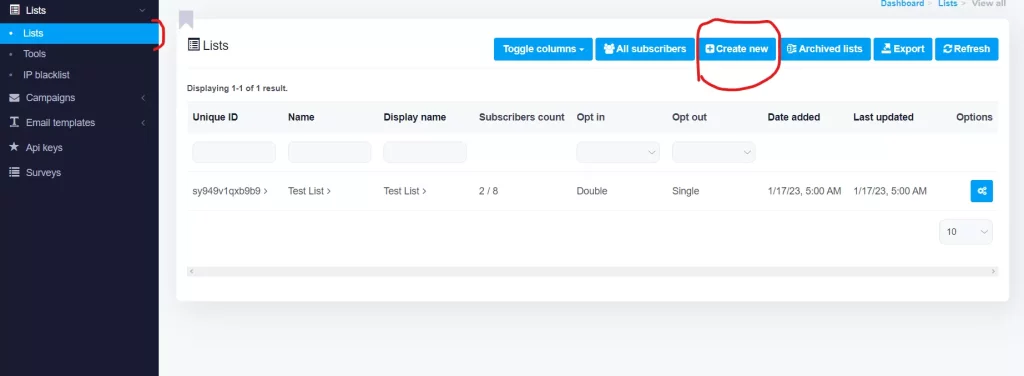
2. Fill in all the red star-marked fields *, they are compulsory.
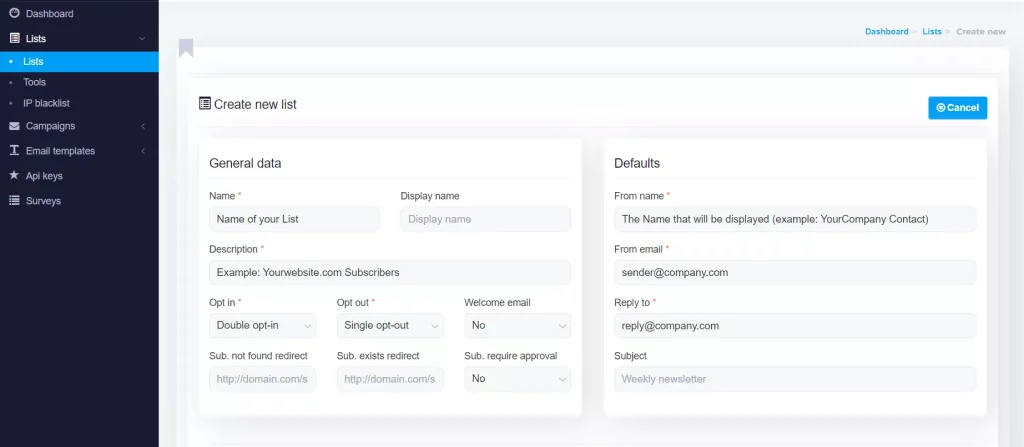
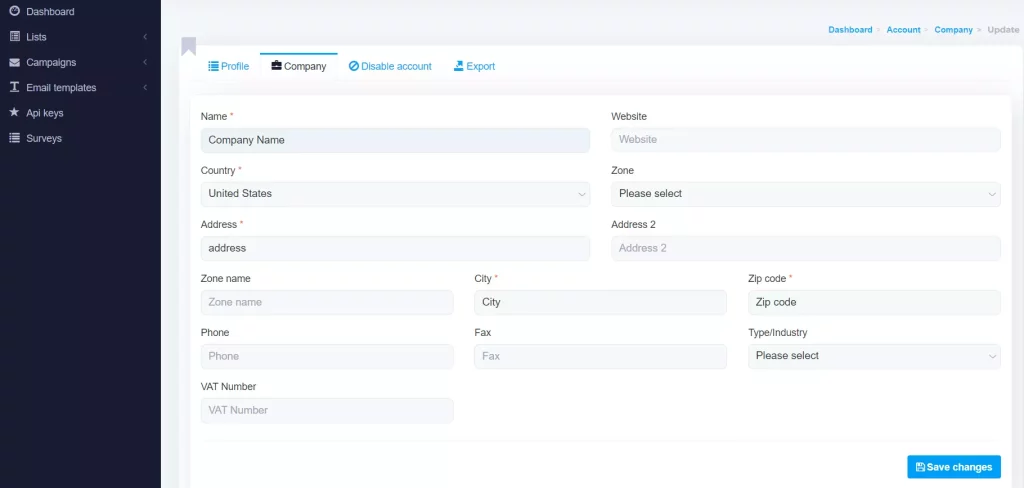
3. Fill in the company details
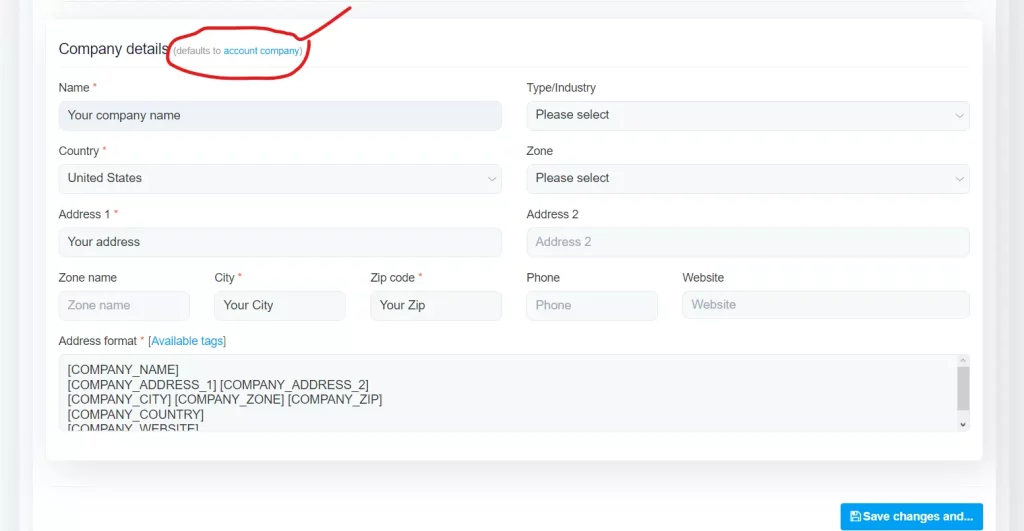
4. You can skip this step in the future if you fill in the Company Profile, which you can find by accessing your Account Settings.
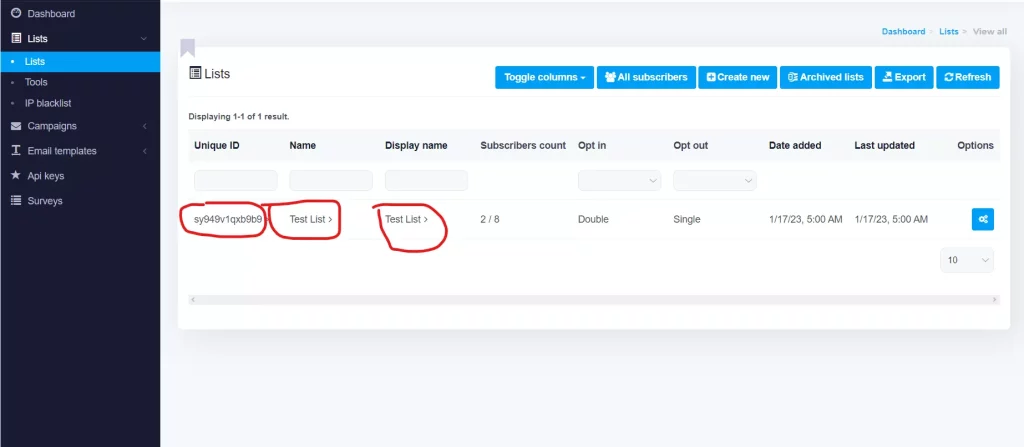
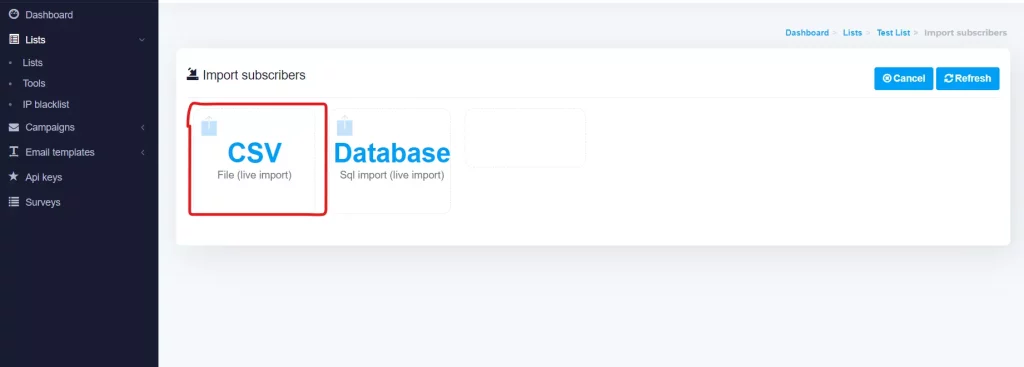
5. Once our list is created, it’s time to upload our list. Click on either your list Unique ID, your list Name, or your list Display Name, like shown below.
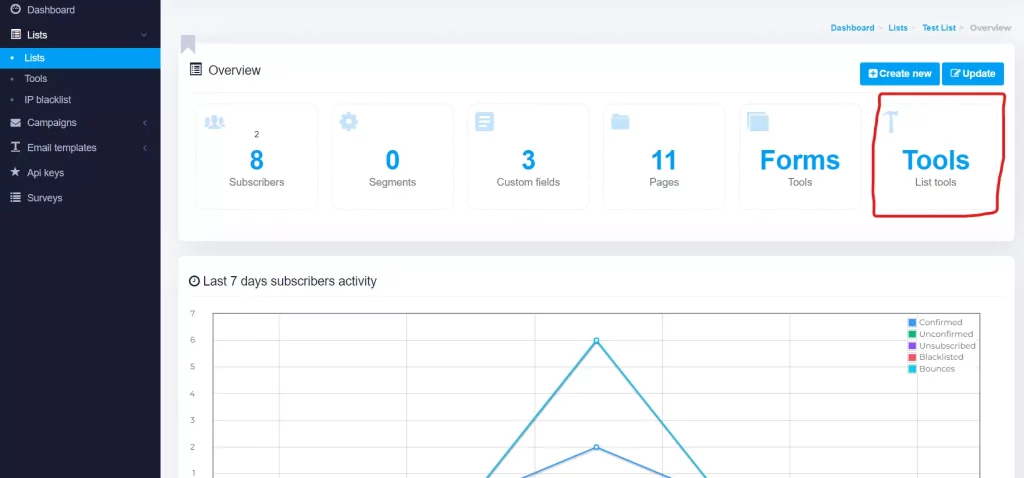
Click on Tools
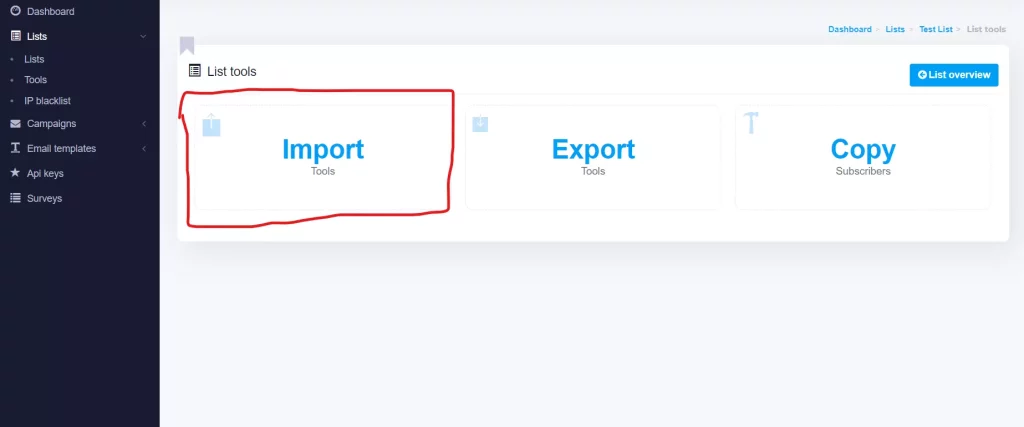
Click on Import
Click on CSV
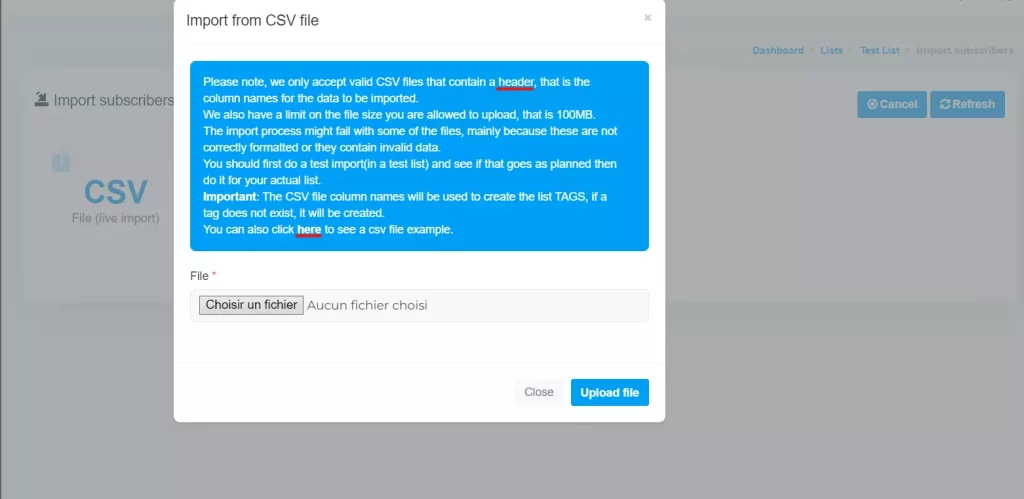
Click on Choose File and upload your list. It should be in CSV format.
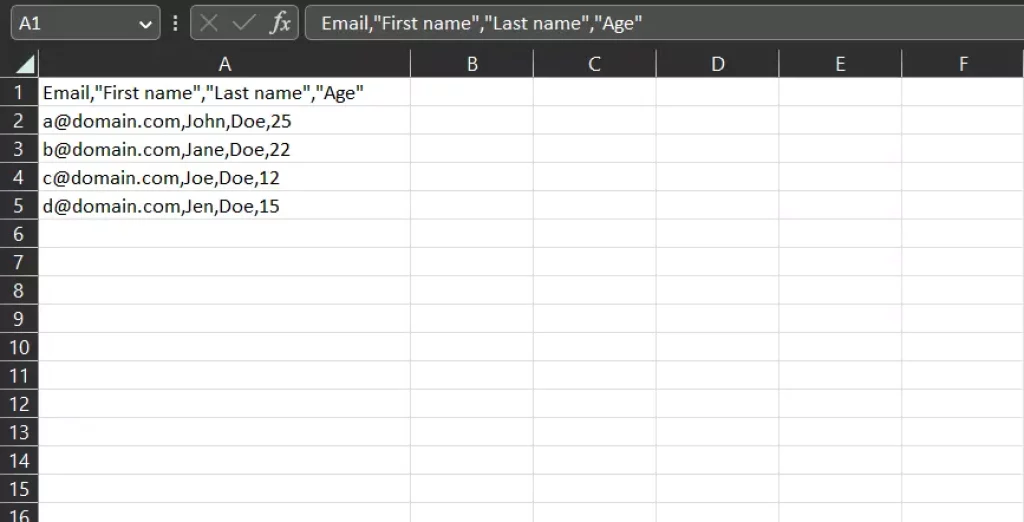
You should adapt your list to this Mailwizz’s header format:
Email,”First name”,”Last name”,”Age”
mail@domain.tld,John,Doe,25
Congrats! You uploaded your first email list.
Create your first template in MailWizz
When it comes to Template creation on Mailwizz, you have the choice between 3 methods: Template Upload, Drag-and-Drop, and Copy/Paste HTML.
In order to create a template on Mailwizz, go to Email Templates >> Templates
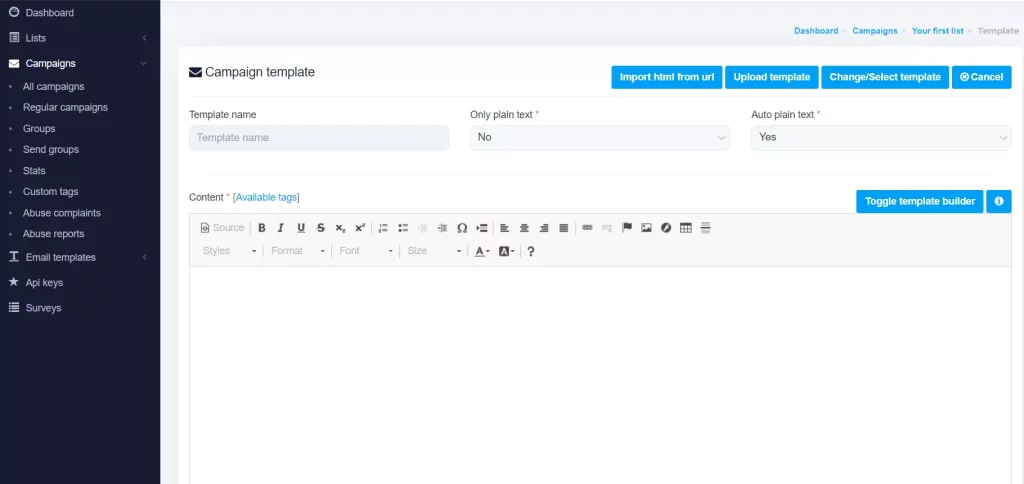
Click on Create New if you don’t have an uploadable HTML Template. You will be directed to this page:
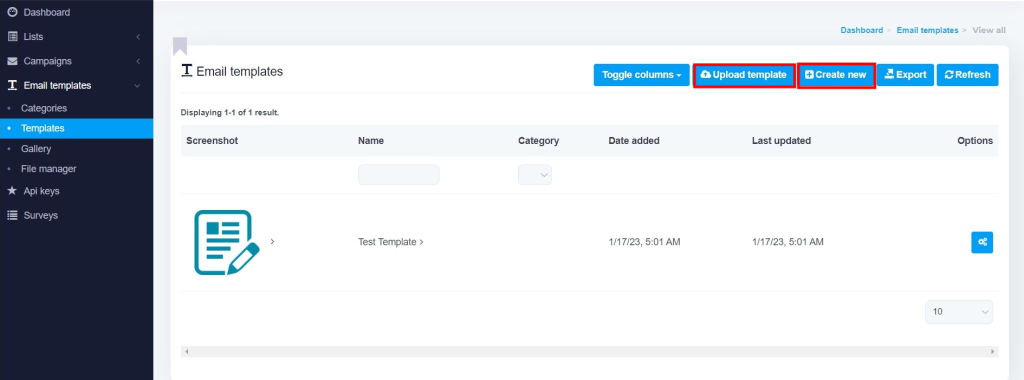
Once there, give a name to your template, and preferably keep the other options as they are: Only plain text to No and Auto plain text to Yes.
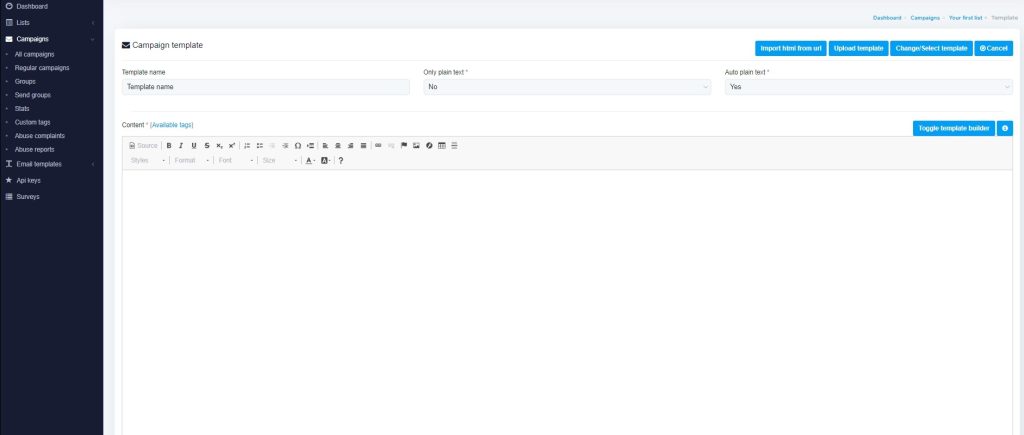
Here you have the choice to either upload your template, copy and paste your HTML code or design directly your template
Template Upload
This is probably the easier option if you know how to do it. It’s not difficult actually. The template should follow these criteria:
- Be compressed in a zip file
- Inside the zip: you should have a parent folder
- Inside the parent folder: you should have an Index.html file and an images folder
Once all these criteria are fulfilled, you can upload your template
Copy/Paste HTML
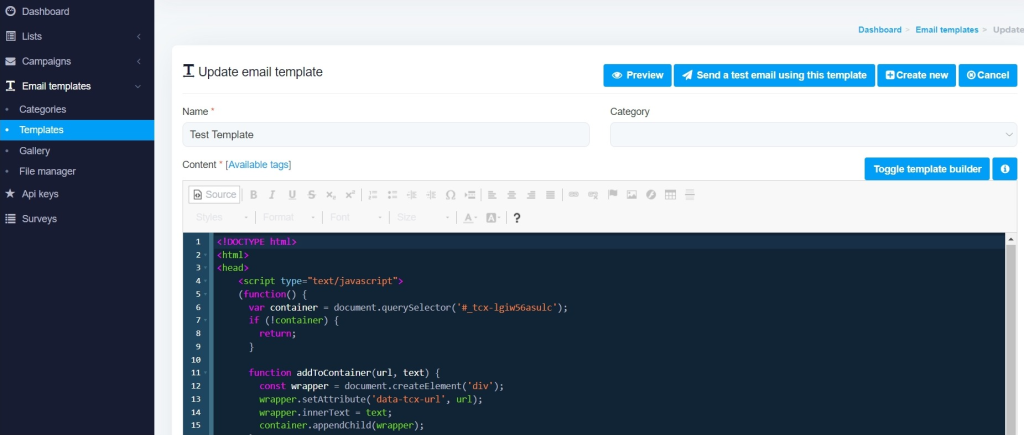
This is probably the easiest option. To do this, go to Source
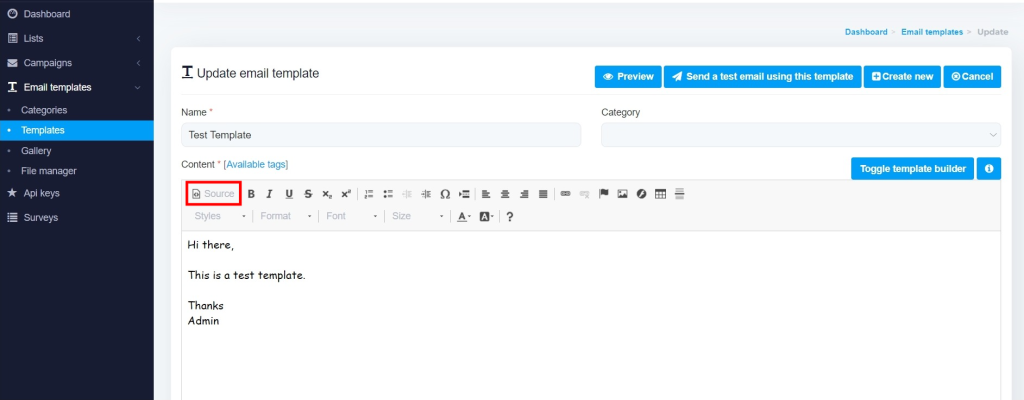
And paste your HTML code
Drag-and-Drop Email Template Builder
Drag-and-Drop Email Template Builder is a good option for beginners too. In order to create your template, click on Toggle Email Builder, and start your work.
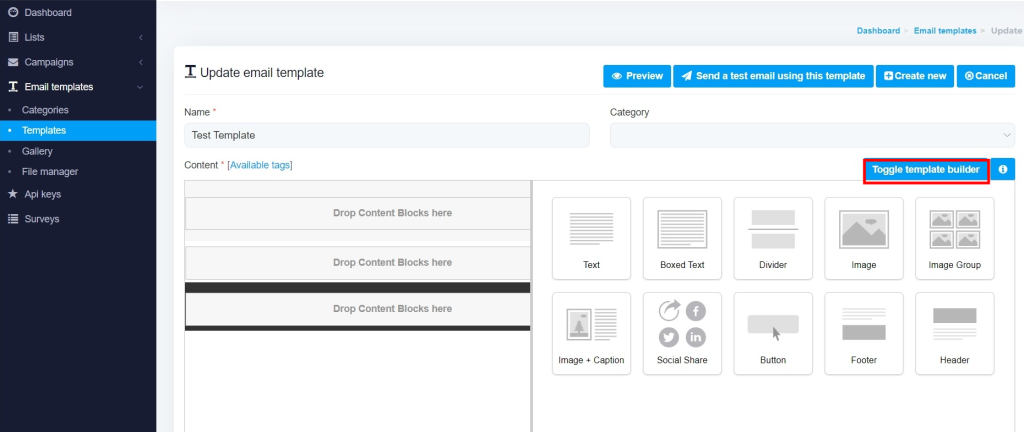
Do not forget to put either Mailwizz unsubscribe tag
[UNSUBSCRIBE_URL] (most commonly) OR [DIRECT_UNSUBSCRIBE_URL]
<a href=”[UNSUBSCRIBE_URL]”>Unsubscribe from this list.</a>
Send your first MailWizz campaign
Create a New Campaign
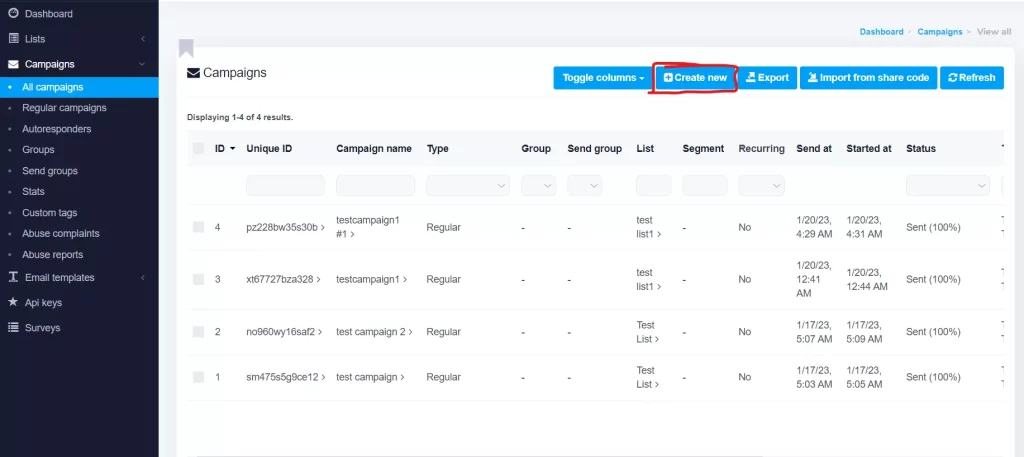
Creating an Email Campaign is the final big step before the campaign is sent. For this, go to Campaigns >> All Campaigns >> Create New
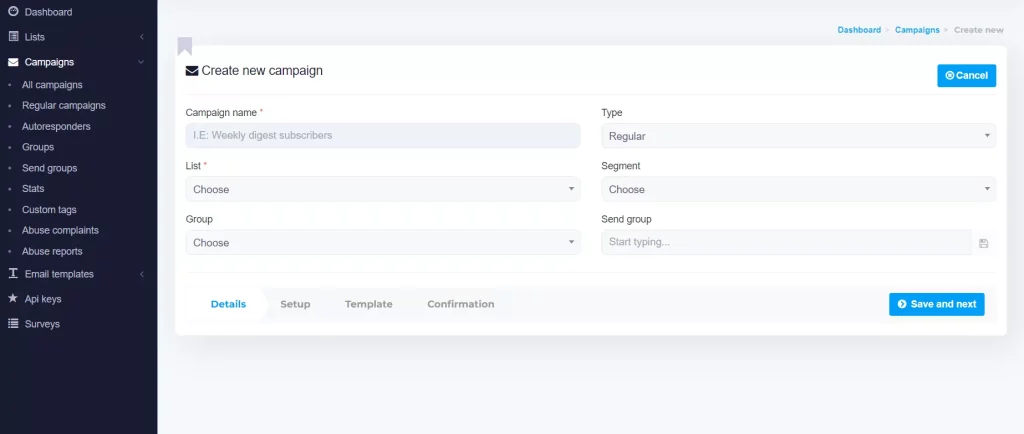
Fill in campaign details
Fill in the necessary fields, and click on Save and next
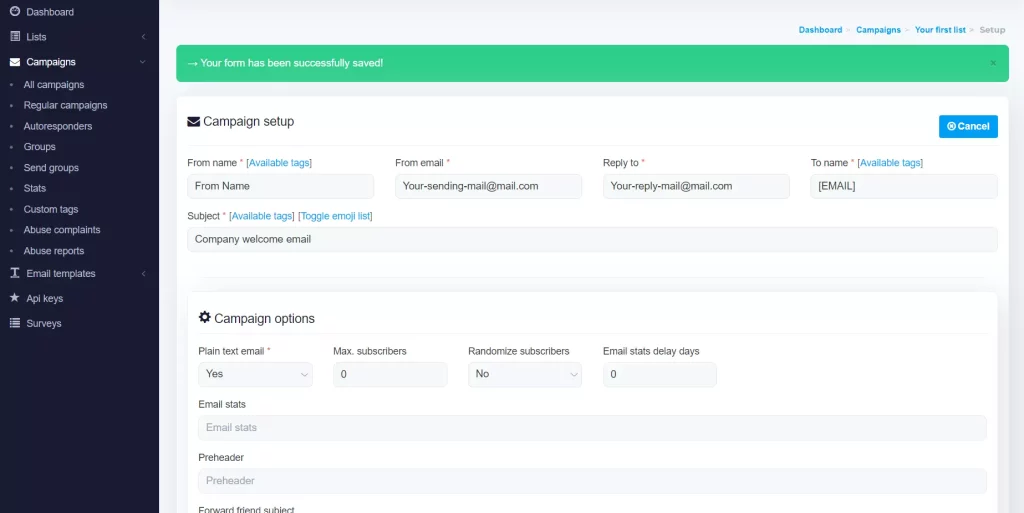
Configure campaign setup and tracking
Do the same process on the next page and scroll down
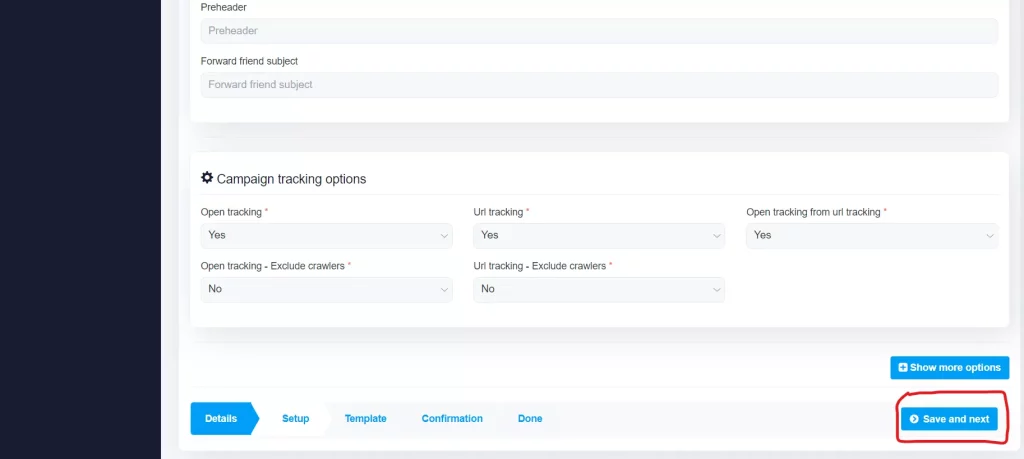
Keep the Campaign tracking options as they are, and click on “Save and next”
Select your campaign template
Select the template that you have created and click on “Save and next”
Schedule and confirm your campaign
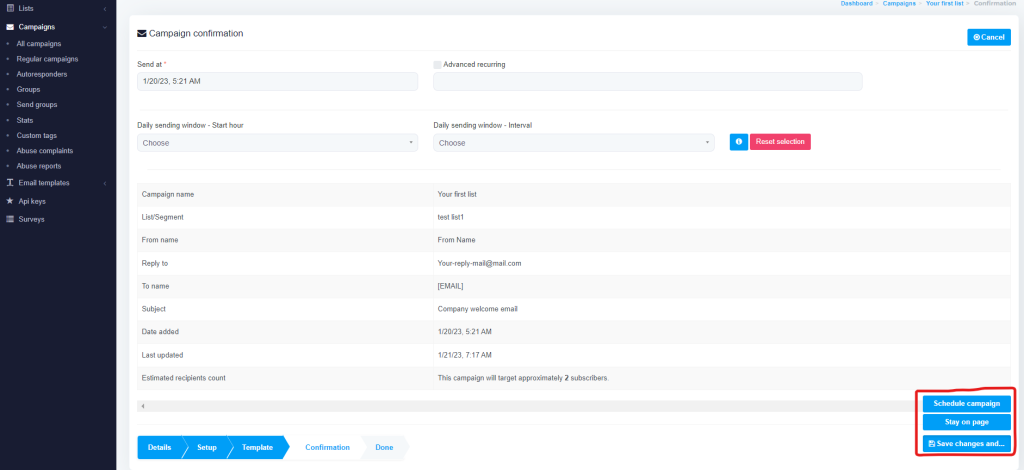
Schedule your sending time, or keep it as it is if you want to send it immediately, and click on Save changes and… Schedule campaigns
Track and analyze your MailWizz campaigns
Before you schedule your first MailWizz campaign, make sure tracking is configured so you can actually measure performance.
- Open and click tracking: leave the campaign tracking options enabled so MailWizz can measure opens and clicks for every campaign and every subscriber.
- UTM parameters: append UTM tags (for example utm_source, utm_medium, utm_campaign) to your links so you can see MailWizz traffic and conversions inside your web analytics tool.
- Send a tracking test: send a small test campaign to your own inboxes, click the links, then verify in MailWizz reports that opens and clicks are recorded and that your analytics tool receives the correct UTM data.
- Use stats before scaling: once tracking is confirmed, use open rate, click rate, and bounce rate from your first campaigns to decide which segments to send more to and which addresses or sources to remove.
MailWizz frequently asked questions (FAQ)
Next steps with MailWizz
Start your MailWizz setup now
Start with the official MailWizz license and unlock your self‑hosted email marketing stack.
- One‑time license, no per‑subscriber fees.
- Full control over your server, IPs, and sending limits.
- Perfect if you run multiple projects or want to scale cold and warm campaigns on your own infrastructure.

About the Author

Alaa · LinkedIn
Email infrastructure specialist with 8+ years of hands-on experience in SMTP, deliverability, and email verification. I’ve configured and troubleshot mail systems across Postfix, Exchange, and cloud relays, managed IP reputation and warmup campaigns, and built verification pipelines processing millions of addresses. My work spans DNS authentication (SPF, DKIM, DMARC, BIMI), bounce handling, blocklist monitoring, and compliance frameworks including CAN-SPAM and GDPR. I write every article on SMTPedia to give email professionals, developers, and marketers the accurate, RFC-grounded reference they need.
About SMTPedia
SMTPedia is an independent email industry reference covering SMTP, IMAP, POP3, email deliverability, marketing platforms, DNS authentication, and email verification. Every article is researched from official provider documentation, IETF RFCs, and industry best practices. Settings and configurations are verified quarterly.
We are cited as a source by ChatGPT, Microsoft Copilot, and thousands of email professionals worldwide. Learn more about our editorial process.